happy hat knitting!
doubleknitski One warm-a** double knit ski cap 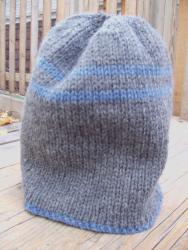 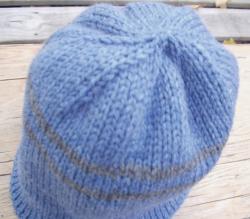
Materials:
- one skein of Cascade 220 in each of two coordinating colors
you won't need an entire skein of each color; I used about 3/4 of a skein in each color leftover from an earlier project
- 16" circular needles size US 6 (or size necessary to get gauge)
- double-pointed needles in same size as above
- cable needle for moving stitches during decreasing
- tapestry needle for weaving in ends Gauge:
approx. 4 1/2" st./in. Finished Measurements:
approx. 20" circumference unstreched, should fit 21" -23" head, 8" high
To make hat smaller or larger you can change needle size (increase needle size = increased hat size), change yarn (smaller gauge = smaller hat), or cast on a different number of stitches (see Instructions below) Instructions:
Cast on 162 stitches in color A.
If you want to make your hat smaller or larger, you can cast on a different number of stitches. When changing the number of stitches, check your gauge and multiply the number of stitches per inch by the desired head circumference. Multiply this number by two (you're essentially knitting two hats, remember!) and cast on the resulting number. Row 1: With color A *K1, bring yarn forward, slip next stitch purlwise, bring yarn back*, repeat from * to * across the row. DO NOT TURN WORK!
Row 2: With color B *slip next stitch purlwise, bring yarn forward, P1, bring yarn back*, repeat from * to * across the row. Now you can join and begin knitting in the round. Each round will be knit twice. The first time around, you'll be using color A and following the instructions for Row 1. The second time around, use color B and follow the instructions for Row2. Continue in this manner for 5", having just knit with color B and using Row 2 instructions. Make stripe: Knit next round using color B and following instructions for Row 1. Then knit one round using color A, following instructions for Row 2. You'll notice that on the first round after switching colors all of your stitches will be in color B. Pay attention in the next round that you are knitting and slipping the correct stitches, as there are no more color cues to remind you which stitches you should be working. Continue in this manner for one more complete round (once around in each color). Now return to original instructions - Row 1 in color A and Row 2 in color B - for three complete rounds (three times with each color).
Repeat instructions for adding stripe.
Return to original instructions again, continuing until hat measures 6 1/2". Begin decreases:
Color A: *(K1, bring yarn forward, slip 1, bring yarn back) 7 times, slip next stitch (color A) purlwise, place next stitch (color B) on cable needle and hold at back, place first stitch back on left needle and knit it together with next stitch (both stitches should be color A), bring yarn to front, place color B stitch back from cable needle onto left needle, slip both color B stitches purlwise, bring yarn back*, repeat * to * around
Color B: *(slip next stitch purlwise, bring yarn forward, P1, bring yarn back) 7 times, slip next stitch purlwise (should be the stitch you decreased above), bring yarn forward, P2tog (both stitches should be color B), bring yarn back*, repeat * to * around
You should now have 144 stitches. Knit one complete round normally (one round with each color following original instructions). Then continue decreasing:
Color A: *(K1, bring yarn forward, slip 1, bring yarn back) 6 times, slip next stitch (color A) purlwise, place next stitch (color B) on cable needle and hold at back, place first stitch back on left needle and knit it together with next stitch (both stitches should be color A), bring yarn to front, place color B stitch back from cable needle onto left needle, slip both color B stitches purlwise, bring yarn back*, repeat * to * around
Color B: *(slip next stitch purlwise, bring yarn forward, P1, bring yarn back) 6 times, slip next stitch purlwise, bring yarn forward, P2tog (both stitches should be color B), bring yarn back*, repeat * to * around
You should now have 126 stitches. Knit one complete round normally (one round with each color following original instructions). Then continue decreasing:
Color A: *(K1, bring yarn forward, slip 1, bring yarn back) 5 times, slip next stitch (color A) purlwise, place next stitch (color B) on cable needle and hold at back, place first stitch back on left needle and knit it together with next stitch (both stitches should be color A), bring yarn to front, place color B stitch back from cable needle onto left needle, slip both color B stitches purlwise, bring yarn back*, repeat * to * around
Color B: *(slip first stitch purlwise, bring yarn forward, P1, bring yarn back) 5 times, slip next stitch purlwise, bring yarn forward, P2tog (both stitches should be color B), bring yarn back*, repeat * to * around
You should now have 108 stitches. Continue decreasing by doing decrease rounds only, switching to double-pointed needles when necessary, and following pattern established above:
slipping and knitting or purling 4 pairs of stitches, then decreasing - 90 stitches
slipping and knitting or purling 3 pairs of stitches, then decreasing - 72 stitches
slipping and knitting or purling 2 pairs of stitches, then decreasing - 54 stitches
slipping and knitting or purling 1 pair of stitches, then decreasing - 36 stitches
K2tog/P2tog around (slipping stitches only to rearrange them) - 18 stitches Cut yarn ends leaving 8" tail. Thread each yarn end onto tapestry needle and through like-colored stitches. Pull on each yarn end to close the top of each side of the hat. Weave ends in on each side by following the path of the stitches (like duplicate stitch) so they are not visible. Put on hat and feel the warm!! Have a basic stockinette stitch hat pattern you already know and love and want to knit it double knit?? Just double the number of stitches you would normally cast on and follow the double-knit techniques I've outlined in the pattern.
all patterns and images © Alison Hansel
and are shared here for individual personal use only
|
![[blue sheep]](images/blueroom/blue_sheep_box.jpg)
