happy baby knitting!
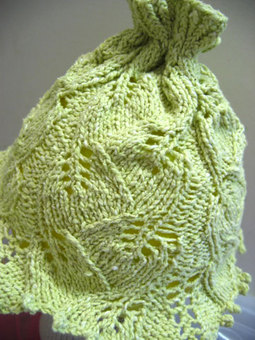
emli bonnet
Inspired by the beautiful embossed leaves sock pattern from Interweave Knits Winter 2005 and Favorite Socks , this baby bonnet has the embossed leaves ("emli" for short) travel down from the top of the hat to a wide brim and delicate picot edge. A fine-gauge cotton yarn is perfect for this lacy summer baby hat. And since there isn't any typical hat shaping, the pattern is easily adjustable for a different gauge or head size. , this baby bonnet has the embossed leaves ("emli" for short) travel down from the top of the hat to a wide brim and delicate picot edge. A fine-gauge cotton yarn is perfect for this lacy summer baby hat. And since there isn't any typical hat shaping, the pattern is easily adjustable for a different gauge or head size.
Measurements
circumference: approx. 16" (see instructions for adjusting to a different size)
length: approx. 7 1/2" (see instructions for adjusting length)
Materials
- 1/2 skein Jaeger Trinity (or about 100 yards similar sport-weight cotton yarn)
- size US5 16" circular needles
- stitch marker
- tapestry needle for weaving in ends
Gauge
6 1/4 sts. and 9 rows = 1" x 1" in pattern
(see instructions for adjusting for a different gauge)
Instructions
The hat is worked from the top down exactly like the socks. Once the hat is desired length, increases are worked to create a ruffled brim.
Top:
Leaving yourself a extra 12" or so, cast on 80 stitches. (The stitch count just needs to be a multiple of 16 - so if you want to make the hat in a different gauge yarn or in a smaller/bigger size, just pick a multiple of 16 that works for you.)
Join to work in the round, being careful not to twist stitches and work 1 1/2" of twisted rib as follows: *K1 tbl, p1; repeat from * across every round.
When ribbing is complete begin Embossed Leaves lace pattern (as given in sock pattern from Interweave Knits Winter 2005 and Favorite Socks). Note: skip those first two purl stitches in the chart and instead begin the pattern with k1 and end it with p3. Continue embossed leaves pattern as established until hat measures approx. 5 1/2" or desired length, having completed rnd 4 or rnd 12. (Since this is a top down hat, you can easily try it on to see if it's the right length before starting the brim. Slip the stitches onto a piece of scrap yarn and cinch up the top ribbing before putting it on baby for a try-on.)
Brim:
Yarn-over increases will be worked every other row in the purl sections separating the leaves.
Rnd 1: *Work first 13 sts (leaf section) in pattern as established, p1, yo, p1, yo, p1; repeat from * to end of rnd.
Rnd 2: *Work first 13 sts in pattern, p5; repeat from * to end of rnd.
Rnd 3: *Work first 13 sts in pattern, p2, yo, p1, yo, p2; repeat from * to end of rnd.
Rnd 4: *Work first 13 sts in pattern, p7; repeat from * to end of rnd.
Continue in this manner - working a yo before and after center purl stitch every other row - until you have worked six increase rows (=140 sts), ending on rnd 16 or 8 and having completed a full leaf.
Bind off stitches with picot bind off as follows:
*Cast on 3 sts with cable cast-on, bind off 6, repeat from * until all sts have been bound off.
Finishing:
Thread extra tail from cast on onto tapestry needle and weave down along wrong side of hat to last rnd of ribbing before leaf pattern begins. Run yarn through every other stitch along this round and then pull gently on yarn to gather ribbing together to form top of hat. Bring yarn back to inside of hat and secure. Weave in all ends.
all patterns and images © Alison Hansel
and are shared here for individual personal use only
|
![[blue sheep]](images/blueroom/blue_sheep_box.jpg)
