happy knitting!
HiP and Silkie
Two hip, tie-inspired belts. The HiP scarf is a narrow, bias version of the Harry Potter striped school scarf. Now you can wear your Azkaban scarf as a light and fun skinny neck scarf, a sassy sash belt, or an almost serious school tie. (For a garter stitch version of this pattern and lots of other Harry Potter knits, get my book, Charmed Knits !) !)
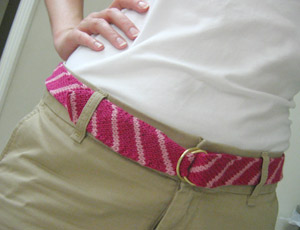
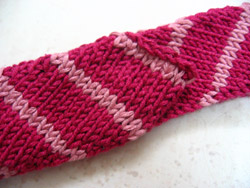
Silkie is an even skinnier (and completely non-Harry Potter) version of the bias scarf, knit in a silky cotton blend with a metal D ring to keep it belted.
HiP
 
Materials
- approx. 150 yds. DK to worsted weight yarn [MC] and 40 yds. DK to worsted weight yarn [CC]
(I used Jo Sharp DK Wool and Lion Brand Woolease)
- circular or straight needles size US6 or 7
- tapestry needle for weaving in ends
Gauge
5 1/2 - 6 sts./in.
(Gauge isn't so important, since it's a pretty simple scarf. You can easily adjust the number of stitches for a different gauge.)
Measurements:
approx. 3 1/2" wide and 60" long or as long as you want
Stripe Pattern
18 rows [MC], 2 rows [CC], 4 rows [MC], 2 rows [CC]
(Note: I carried the [CC] across the 4 rows of [MC], but cut it and started a new strand after completing the 18 rows [MC])
Instructions:
With [MC], cast on 22 stitches. (Change this as you like for your yarn and desired width: a couple more stitches for a thinner yarn; a couple less for a thicker yarn.)
Row 1 (RS): K1, K2tog, K to last 2 stitches, inc (by knitting into the stitch in the row below the first stitch on the left needle), K to end.
Row 2 (WS): Purl
Repeat rows 1 and 2, following stripe pattern above, until scarf is approximately 60 inches long, or desired length, ending having completed 18 rows of [MC]. Bind off all stitches. Weave in ends. BLOCK! (The scarf will curl up on itself and will need to be wetted and pinned out flat to dry.) Tie around your hip - or your neck - and be hip!

Silkie
Materials
- 2 balls Debbie Bliss Cathay, one each in of two different colors
(This should be enough to make two silkies.)
- circular or straight needles size US4
- tapestry needle for weaving in ends
- 1 or 1 1/2 inch size D rings
Gauge
6 sts./in.
Measurements:
approx. 1 1/4" wide and as long as you want
Stripe Pattern
4 rows [MC], 2 rows [CC]
(Note: I carried both yarns along the side of the work.)
Instructions:
With [MC], cast on 3 stitches. Purl one row.
Row 1 (RS): K1, M1L (by lifting bar between last and next stitch onto left needle untwisted and knitting it through the back loop), K to last stitch, M1R (by lifting bar between last and next stitch onto left needle twisted and knitting it through the front loop), K1.
Row 2 (WS): Purl
Repeat rows 1 and 2, following stripe pattern above, until there are 13 stitches.
Continuing stripe pattern, begin diagonal shaping, by purling all wrong sides and working the rights sides as follows: K1, K2tog, Knit to last stitch, M1R, K1. Continue until work is about three inches less than your actual waist measurement, ending with a WS row. (This yarn will stretch a bit with blocking and wear, so you want this definitely to be smaller than your waist.)
Since the inside of the tie will be visible after it is looped through the D ring, the right side and wrong side must now be reversed. On the next row, begin working same diagonal pattern in reverse stockinette as follows:
Row 1 (new RS): P1, SSPb (slip next 2 stitches knitwise, return them to the left needle, and purl them together through the back loops), purl to last stitch, M1L purlwise (lift bar between last and next stitch onto left needle untwisted and purl through the back loop), P1
Row 2: Knit.
Repeat rows 1 and 2 for approximately 6 to 8 inches. (You want this piece to be long enough to go through the D rings, cover the section where we reversed right and wrong sides and hang down as long as you like.)
Make point by continuing to knit all wrong sides and working right sides as follows: P1, SSPb, purl to end. Work in this manner until 8 stitches remain, then bind off all stitches.
Weave in ends and BLOCK! (The tie will curl up on itself and will need to be wetted and pinned out flat to dry.) Loop the cast on edge of the scarf into two D rings, folding over about 1/2 inch to the inside. Whipstitch into place. Volia - silk tie belt!
(If you want to make this pattern REAL EASY, don't worry about reversing the right and wrong sides, making the point or sewing in D rings - just knit it like the HiP scarf, with 13 stitches and tie it on your waist like a sash.)
all patterns and images © Alison Hansel
and are shared here for individual personal use only
|
![[blue sheep]](images/blueroom/blue_sheep_box.jpg)
