![[blue sheep]](images/blueroom/blue_sheep_box.jpg)

alison's ankle socks
|
the knitsmithy the blue blog works in progress finished projects free patterns |
|
alison's ankle socks (and short-row tutorial) Lightweight, ankle socks with or without pom poms. Summer fun for your feet! 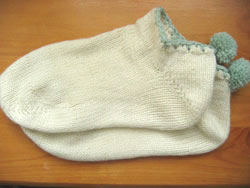 [MC]: 1 skein Rowan Cashsoft 4ply in white (approx 175m of similar weight yarn, like Koigu or Rowan 4ply soft) [CC]: 1 skein Rowan Cashsoft 4ply in green (small amount of similar weight yarn will do) 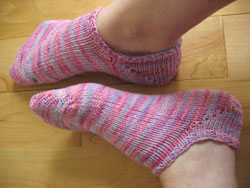 1 skein Koigu color #200 Sizing/Yardage Info: This was plenty of yarn to make anklets for my feet, which are about average width for a woman's foot and 10 inches long. You should be able to make your socks shorter and wider and still have enough yarn. Gauge: 26 st/ 4in. Needles: 3.25mm / US3 Instructions: To make the heel, you'll be working on the next 26 stitches only using your preferred method of short-rowing (such as the traditional wrap and turn method, described here, or Priscilla Gibson-Roberts' yarn-over method, described here). I like PG-R's method, so this pattern is written as a sort of tutorial in that method, but if you're using the wrap method, just substitute all the "turn and work backwards yarnover" with "wrap next stitch and turn" and see Wendy's tutorial (link above) for step by step instructions and pictures. Begin heel by knitting across next 25 sts. Turn and work backward yarnover. Purl across next row until only one stitch remains on the left needle and turn and work backward yarnover again. Knit across next row up to (not including) the first stitch with yarnover, then turn and work backwards yarnover. Continue in this manner, working one less stitch each row, always working a backwards yarnover after turning, until only 8 stitches remain without yarnovers. 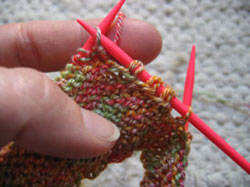 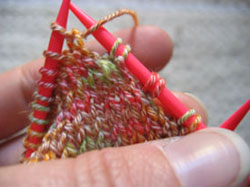 click for the entire picture tutorial With RS facing, knit to the first stitch with a yarnover. Knit the stitch normally, correct the twist in the yarnover and knit the yarnover together with the next stitch. By connecting the yarnover with the following stitch, you're closing up any gap made by doing a short row. Turn and work backwards yarnover (yes, now there are two yarnovers right next to each other). Purl across WS to first stitch with yarnover. Purl that stitch normally, then purl it's yarnover together with the following stitch. (When working stitches together on the WS, I prefer to slip stitches knitwise onto right needle, move them in this position back to left needle and purl them together through the back loops. I think it gives them a cleaner look. Thanks to Michelle for this tip!) Turn and work backwards yarnover. 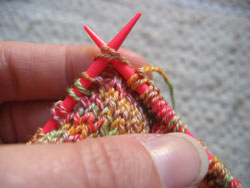 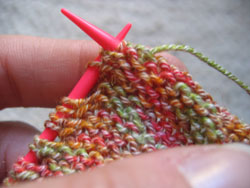 click for the entire picture tutorial *Knit to first stitch with yarnover. Knit that stitch normally, then correct the twist in the following two yarnovers and knit them together with the next stitch. (Yup, that's a knit 3 together!) Turn and work backwards yarnover. Purl to first stitch with yarnover and purl it normally. Purl the following 2 yarnovers together with the next stitch through the back loop. Turn and work backwards yarnover.* Repeat from * to * until all stitches have been reincorporated into the heel. You're almost there! 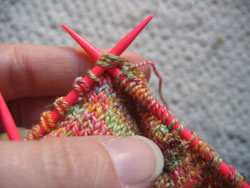 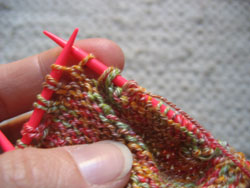 click for the entire picture tutorial Once you finish the last RS row of the heel, begin knitting in the round again. You can knit the last yarnover on the RS together with the first stitch on the next needle. Then when you have almost finished the instep stitches, knit the last remaining yarnover (it's still on your needle with your heel stitches) together with the last stitch of the instep. This will help close up any holes in that area. Keep knitting around to about two inches less than desired foot length. Work the toe just like the heel, doing short-rows over the same 26 stitches that you worked for the heel. When you are done with the toe, you can rearrange all the toe stitches on one needle and all the instep stitches on another and kitchener stitch them together. 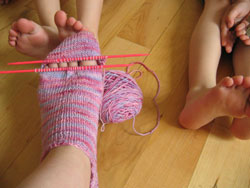 Finishing:  - for both socks: and are shared here for individual personal use only |