happy scarf knitting!
beginner's scarves Five simple scarf patterns for beginners, arranged starting with the easiest, each scarf adding one new technique or twist.
The patterns are all written for worsted weight yarn, so beginners can use the leftovers from the beginner's hat to start. But since size isn't a real issue when you're dealing with scarves, feel free to try a different yarn with a similar gauge. Or for a quick knit, try some bulky yarn and follow the numbers in italics.
The adventurous beginner can also try changing colors by dropping the old yarn at the end of a row and starting the new row with a different colored yarn. When weaving in ends, twist the two colors around each other once to close any hole that might have formed when changing colors and weave ends into their respective color areas.
Materials
- approx. 150-300 yds. worsted weight yarn - depending on scarf length (a little less if you're using bulky yarn)
- circular or straight needles size US8, unless otherwise noted (US10 for bulky yarn)
- crochet hook if making fringe
- tapestry needle for weaving in ends
Gauge
approx. 4 1/2 st./in. (approx. 3 st./in. for bulky yarn)
Techniques
- casting on
- garter stitch = knit all rows
- 2x2 ribbing = *K2 stitches, P2 stitches* repeated across the row, turn, work stitches as they appear on the other side
- fringe = cut pieces of yarn twice as long as desired fringe length and fold them in half; insert crochet hook into one stitch at the edge of the knitted piece and grab the loop formed by folding; pull that loop to the other side, then pull the fringe ends through the loop and tighten; voila, fringe!
- yarn over = do not insert right needle into next stitch, but do wrap yarn around right needle as if you were knitting a stitch
- K2tog = knit next two stitches together
- binding off = work 1st stitch, * work next stitch, pull first stitch over second*, repeat * to *
- weaving in ends
LOOPY GARTER STITCH SKINNY SCARF
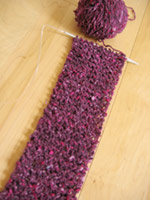
Measurements:
approx. 3 1/2" wide and as long as you want
Instructions:
Using larger needles - size 10,11, or 13, the bigger, the loopier -, cast on 12 st. (for bulky yarn, use US13 or US15 and cast on 8 st.).
Work in garter stitch (knit all stitches) until scarf is desired length.
Bind off stitches.
Weave in ends.
Add fringe if desired.
Wrap around your neck and be hip!
SIDEWAYS GARTER STITCH SCARF
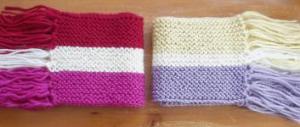
Measurements:
approx. 45" long and as wide as you want
Instructions:
Using a long circular needle (at least 24" long), cast on 220 st. (with bulky yarn, cast on 140).
Work in garter stitch (knit all stitches) until scarf is desired width.
Bind off stitches LOOSELY (don't pull yarn tightly after making a stitch, otherwise this edge will be too tight).
Add fringe if desired (you can incorporate the yarn ends into the fringe!).
Weave in ends if you didn't add fringe.
Wear it with pride!
SIMPLE RIBBED SCARF
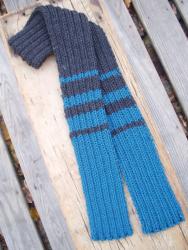
Measurements:
approx. 8" wide and as long as you want (note: ribbing will usually cinch in making the scarf skinnier)
Instructions:
Cast on 38 st. (26 stitches with bulky yarn). For a skinny scarf, cast on 18 (14 stitches with bulky yarn).
Row 1: Work 2x2 ribbing across the row, beginning with K2 and ending with K2. Turn.
Row 2: Continue ribbing by working stitches as they appear, beginning with P2 and ending with P2.
Repeat the last two rows until scarf is desired length.
Bind off stitches in rib (if the stitch is a knit stitch, knit it; if it's a purl stitch purl it; pull stitches over one another as usual).
Weave in ends.
Put it on and enjoy!!
RIBBED KEYHOLE SCARF
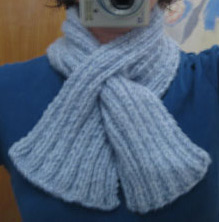
Measurements:
approx. 8" wide and 26" long (note: ribbing will usually cinch in making the scarf skinnier)
Instructions:
Cast on 38 st. (26 stitches with bulky yarn).
Row 1: Work in 2x2 ribbing across the row, starting with K2 and ending with K2.
Row 2: Continue ribbing by working stitches as they appear, beginning with P2 and ending with P2.
Repeat the last two rows for 22".
Make opening: Work ribbing for first 12 stitches, bind off 14 stitches, continue ribbing over remaining 12 stitches (with bulky yarn, work ribbing for 8 stitches, bind off 10, continue ribbing over remaining 8 stitches).
Next row: Work ribbing for first 12 stitches, cast on 14 new stitches over the gap, join to stitches on other side of the gap and continue ribbing (with bulky yarn, work ribbing for 8 stitches, cast on 10 new stitches over the gap, join to stitches on other side of the gap and continue ribbing).
Continue working in rib across all stitches for 4 more inches.
Bind off stitches in rib (if the stitch is a knit stitch, knit it; if it's a purl stitch, purl it; pull stitches over one other as usual).
Weave in ends.
Wrap around neck, push one end through hole on other end and see how stylish warm can be!
NECKWARMER 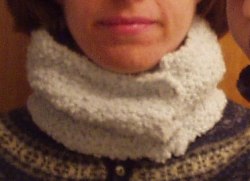
Measurements:
20" long, 4" high Instructions:
Cast on 85 st.
Work back and forth in garter stitch (knit all rows) for one inch.
Make buttonhole: K3, yarn over, K2tog, K to end of row.
Continue knitting in garter stitch for two inches (Knit an odd number of rows, so you can make your next buttonhole on the same side as the first).
Make buttonhole: K3, yarn over, K2tog, K to end of row.
Continue knitting in garter stitch for one more inch.
Bind off stitches LOOSELY (dont pull yarn tightly after making a stitch, otherwise this edge will be too tight).
Weave in yarn ends.
Sew buttons to other end of neck warmer opposite buttonholes.
Be warm! (For an even easier version, you can use snaps instead of buttons. In that case, you do not need to make any buttonholes. Just knit in garter stitch for four inches, then bind off and sew on snaps.)
Or try out my orange bliss scarf pattern. Incredible yarn, easy pattern - you'll love it!
all patterns and images © Alison Hansel
and are shared here for individual personal use only
|
![[blue sheep]](images/blueroom/blue_sheep_box.jpg)
