![[return to the blue blog]](images/blueroom/blue_sheep_box.jpg)

november 2003
the knitsmithy the blue blog - archives works in progress finished projects free patterns contact: alison [at] knitsmiths [dot] us |
|
november 2, 2003
project parade I am so glad to be home and out of the one project duldrums. I was enjoying working on sooty mango, but since I got back and saw my stash I've been very excited about all the new projects I can start. A one project knitter I am not. And now, without any further ado, I present the new project parade. First up, the leftovers.
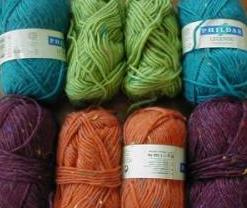
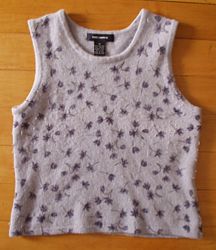
Finishing up the boys' giranimals jackets reminded me that I had collected quite a few leftovers of the wool/alpaca yarn and was planning on making a fall vest for myself out of them. It's fall, so why not. And yes, phildar fillies, it is Phildar yarn! I've got leftovers in about five or six colors ranging from a half a skein to two skeins in each color, which means I'm going to try to put my need to order things aside and make random (gasp!) stripes. This is a big deal for me. And since I'm winging it with the stripes, I figure why not do the whole deal and wing it with the pattern. Instead of following a pattern, I'm going to try to copy the shaping of an old shell I have from a twinset I bought about 10 years ago. The cardigan is full of holes (I think the moths found it one summer) and is now in the garbage. And the poor little shell had an exciting, but miniturizing, dryer adventure a while back. Oops! Stay tuned tomorrow for another new project and maybe even some actual knitting.... posted by alison at 9:32 am
| comments (4)
november 3, 2003
marching on Four days back from vacation and we're sleeping well enough that I got some knitting done!
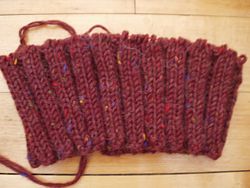
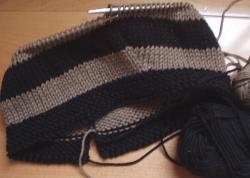
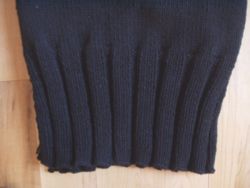
Here's the ribbing on the leftovers vest. I liked the deep ribbing so much on sooty mango that I've decided to do it on this vest as well. I knit the ribbing with two strands held together, so it's nice and bulky. But I'll knit the rest of the body with a single strand, cause I'm not sure if I have enough yarn to do bulky for the whole thing. Plus, it would be blazing hot! For those of you who saw me working on the stripes at Knitsmiths yesterday, yes, I frogged all the stripes that I had finished. Random is hard for me. I think I'm going to have to do a lot of ripping to get the random right!! And joining the new project parade is my mother's fandango vest. This is the first and largest of my Christmas projects, so I wanted to get it started right away. All I did was cast on, but knowing it's on the needles will help me get motivated to work on it.
Even on 8mm (US 11) needles, this is going to be a big project, as mom likes her clothes long and oversized. She also enjoys color, can you tell? Now we know where I get it! posted by alison at 7:53 am
| comments (12)
november 4, 2003
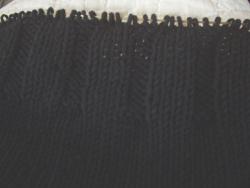
little black sweater Sure I love lots of color, but a girl can always use a nice black sweater, so despite the new project push, I did a some more work on sooty mango. Here's the finished front.
Did that neckline about four times! Since the Mango pattern doesn't include sleeves, I'm roughly following the shaping from Cherry Picking (in the same book) for the top of the sweater. But the total stitch count is taken from Mango, so I had to fudge and refudge the shoulder and neck parts quite a bit to get the right number of decreases for the correct neck depth and width. Glad that's over! Now on to the sleeves... But what about the project parade? Right! Well, while I work on the same old, same old, let me direct your attention to some amazing knitalong projects, including Rose's finished poncho, Melinda's beautifully seamed Phildar cardi raye and Kimberly's pink poncho in progress. Wowie - great work, ladies! posted by alison at 7:57 am
| comments (4)
november 5, 2003
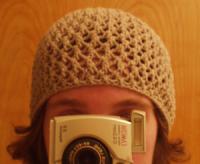
enter hats The new project parade continues with more hats. Christmas hats and chemo caps. Whatever I can make in the next few weeks. I'm teaching a beginning knitting class now, where we are supposed to make a hat in three weeks, so we'll see what I can accomplish hat-wise while helping the new knitters through the basics. Hats on my list to make include another calmer lace cap and then a couple more kids' chemo caps. Here's my start on the first chemo cap. I'm imagining this one to be for a hip little dude in need of a phat hat.
posted by alison at 8:06 am
| comments (6)
november 6, 2003
sheep shape So I go to Germany and visit the giant boardgaming fair and what is my favorite souvenir: this sheep shirt. The sheep is from a little card game called Attribute. We didn't buy the game, but I had to have the shirt!
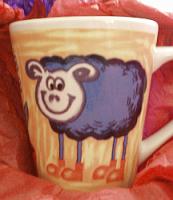
And on my first visit to the knitting group after returning from vacation, fellow Knitsmith Kimberly gave me this cute sheep mug. A blue sheep for my blue knitblog. How cool!
Not that I'm collecting sheepy stuff or anything. Since we're on the subject, how much sheepy stuff is okay and when does too much sheepy become a little creepy? posted by alison at 7:53 am
| comments (16)
november 7, 2003
phildar friday Hey all you Phildar Fillies, how you doing out there? What are you planning on making? Did I miss any Phildar finishing (Claudia?)? Who else has cast on already?? I'm still conflicted about which Phildar project to start first. Instead of deciding, I picked up a couple more Phildar catalogs while I was on the other side of the Atlantic. I particularly like the Irlandais book with aran designs. One of my favorite designs from that book is being offered as a free pattern (in French) on the Phildar site: check it out! I may just have to add that one to my ever-growing list of phildar fashions to make. With this much indecision, I should be able to make some serious progress on my other projects though. Like my Phildar leftovers vest. How do you like them stripes?!
posted by alison at 12:34 am
| comments (16)
november 8, 2003
surfing from the sick bed My husband and the boys have just recovered from a brief but mean little cold bug. And finally I have succumbed. So it's sofa therapy for me: my favorite sick day film (Pride & Prejudice) in the VCR, wi-fi internet surfing, and some knitting between naps. I'm counting on the Advil high and my one still open nostril to hang on long enough to get me over the worst part. posted by alison at 7:29 am
| comments (13)
november 10, 2003
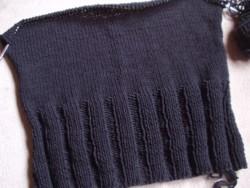
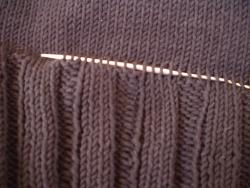
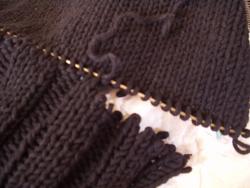
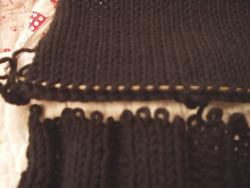
boy, do I feel better Since I was already feeling miserable over the weekend, I decided to tackle that rather unsatisfactory ribbing on my sooty mango. If you recall the problem was with my tension while knitting continental and switching between knit and purl stitches. I tried Stacy's suggestion of twisting the first purl stitch after switching from knit to purl and had some definite improvement, but a faint line still developed at the left of each rib. So, it was off with the ribbing! I've done this before and it worked well, so as far as I'm concerned it's ALWAYS and option! A few pics from the sofa: I threaded the needle through the stitches right above the ribbing, snipped the edge stitch below the row now on the needle, and pulled the yarn through each stitch to unravel. Here's the ribbing completely separated, then a quick check of the pattern (read it backwards!) and begin reknitting the ribbing in the other direction. And with the other hand!! And now I've got some respectable ribbing I'd be happy to wear.
I'm still getting kicked around a little by my cold, but boy do I feel better! posted by alison at 8:13 am
| comments (10)
november 11, 2003
sleeve hell Had a great time at Knitsmiths this week, as usual! Lots of really interesting projects: Tanya just finished an amazing afghan and Amber was making a giant bucket-o-chic hat for her rather large-headed dad. It seems that many of the rest of us were working on sleeves. Ingrid had a sleeve for her textured slip stitch cardigan in hand, Kerstin a sleeve for her Femme Fatale, and I a sooty sleeve. After discussing all the sleeves in progress we came to the conclusion that sleeves take forever! They just won't end. Luckily we had mini mozart balls from Germany so we could nosh our way through sleeve hell. posted by alison at 8:11 am
| comments (15)
november 12, 2003
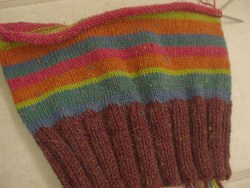
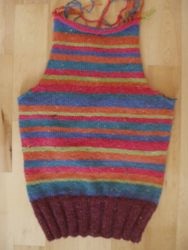
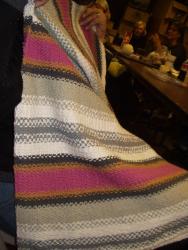
headway While I was sick, I made lots of headway on the leftovers vest. This was actually a pretty good cold for knitting. I felt alright when sitting on the sofa snuggled up in a blanket. Getting up was a different story though - something about head congestion at a five and a half foot altitude, I guess! Anyway, after knitting in the round for the bottom (fewer ends to weave in that way), I separated at the armholes, and made up some armhole shaping. Had a few problems there remembering to do the shaping and keep changing the colors. I blame my sinuses! But since I wasn't going anywhere, I was able to rip and reknit a few times. So here's the finished back.
I decided on a few loose rules for the stripes and felt much better then about the level of randomness. I have lots of the orange and pink yarn (thanks, Kerrie!), so those colors repeat more often than the others. And have only a precious little bit of the chartreuse left, so that one serves as a highlight every four inches or so. Now I have to invent some sort of neck for the front while repeating the stripe sequence I made up for the back. I decided to wait on that until my head was all cleared! Only a little headway was made on my chemo caps though. I left the one I started last week right at the point of beginning the crown decreases, so the beginning knitting students and I can go through that part together in the last class. For this week's class I started another chemo cap. I was showing the students how to join to knit in the round and knit some ribbing for the brim. So, in order to be able to knit along with them, I decided to start a new hat. I'm following a pattern in Monkeysuits for a hat that looks more like a bonnet. S was nice enough to try on what I've knit so far. He's not so good at holding still, though!
Finally, here it is November 12th and beyond buying yarn, I've made absolutely no headway on my Christmas presents: four scarves and two hats. Please tell me there are six weeks left until Christmas!! I'll have to start a 'one-present-a-week' schedule. Ugh! posted by alison at 9:06 am
| comments (16)
november 13, 2003
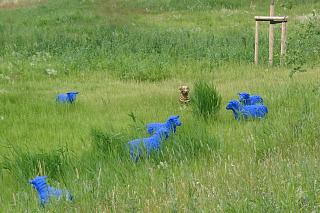
dreaming of blue sheep More blue sheep! In honor of my blue knitting blog, Inga from Hamburg sent me this terrific picture of an art installation she saw at a garden show.
I love it! These little guys are definitely finding a permanent home here at the blue blog. For now I'm letting them graze in the title banner and on a new button. What d'ya think? posted by alison at 8:53 am
| comments (24)
november 14, 2003
phildar fillies, the first wave Sometimes a project, or a knit-along, will transform itself into something other than what you had originally planned. Well, this little knit-along did just that. Seems like summer just sort of ran out on our little group. Clemence finished a great striped top and then I converted the pattern into a fun vest for Fall. The knit-along itself was reborn as the Phildar Fall knit-along now ongoing. Anyone knitting anything Phildar this Fall, please join us!
Phildar, anyone? alison
summer 2003 red = finished posted by alison at 12:34 am
| comments (3)
knit-along news With all these impromptu projects like vests and chemo caps, I'm falling behind on my fall knitalongs! Indecision and more new catalogs have so far kept me from starting my fall Phildar sweater. But fear not, Phildar fillies, yarn is on its way from France and I'll be off to the races soon after it arrives. The cardi raye and Leigh's sweater are on hold for now, as I have got to take a break from stripes for a while! Solid colors or variegated yarns will be my friends for the next few months. My Phildar fall will now look more like this or this. My hand pain from last month led me to postpone teddy, the tiny-gauged winter cardigan (yes, the striped one!) I had planned to make for Curls and Purls' fun Fall/Winter Knitalong. All those Rowanette/Elfin knitters are crusing along and I haven't even swatched yet! The yarn I've picked out to use is the most wonderful alpaca yarn ever. Sooo warm and so soft, but also oh so fine (3mm needles!). This is going to be a huge project. But there's no way I can start it until after Christmas (make frowny face now) because I've got to get cracking on my holiday gifties. And the knit-alongs just keep on coming. If you haven't noticed it in the sidebar, there's a new knit-along in town. Yup, I've started a holiday gift-along in hopes of finding motivation to get through all those knitted gifties I'm supposed to knit. I'm so excited about all the others who have joined. Some of you have so many gifts planned. Amber - 31?! I like Claudia's modest goal of making two presents. That's the way to do it. In that vein, I'm slowly knitting my way through my husband's family. I started with the babies last year and am now up to those my age this year. That means three hats for three sibs-in-law. Then there are a few striped scarves for friends. First up: a Calmer lace cap. Let me know what you're knitting this season! And if you're gifting-along, send me an email as you finish your projects, so I can update the list and we can celebrate! Go you generous knit-gifters! posted by alison at 8:30 am
| comments (21)
november 15, 2003
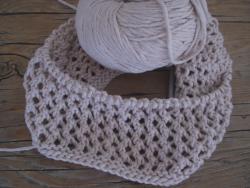
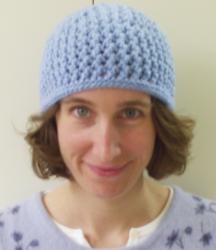
a little calmer I've finally started my Christmas knitting and am feeling a little better about my chances of getting it all done in time. Here's the first few inches of the Calmer lace cap.
I'm using Rowan's Calmer yarn as called for in the pattern. I really like the pattern and the yarn is an absolute dream! It has a wonderful hand and is just a joy to knit. (Laura, you and I have got to make that Calmer sweater!) posted by alison at 9:07 am
| comments (7)
november 17, 2003
nice yarn gods The yarn gods have come through again. They have saved sooty mango and me from sleeve hell. So here's the story... I'm adding sleeves to the mango tank pattern. And I just happen to like wide, long sleeves. Since I wasn't really following a pattern here, I decided make the sleeves exactly how I want! I had 10 balls of sooty all seasons cotton - no more than five were needed for the body, so I'm thinking I'm in good shape. To get the annoying ribbing out of the way, I go ahead and knit each sleeve up to the beginning of the sleeve cap shaping. Before I start the sleeve caps I run upstairs to my stash to get another ball of yarn. But there is no more sooty yarn left in my stash. Each sleeve has a meager little rest hanging off of it and then there's some palm sized remainders in the project bag and that's it! Finishing the first sleeve cap takes all the yarn hanging off the sleeve and all the little remainders in the bag. For the last sleeve cap, I've only got the little bit left hanging from the sleeve. Impossible! Of course the yarn is discontinued. There's some available from English Yarns, but I'd only need one skein. What a pain! I decide to just knit that sleeve as far as it will go and then order the extra ball. So I knit, and decrease, and knit, and decrease, and four more rows of shaping like so, and then six more shaping like so, and then three more like so, and then bind off and wait... I'm done. How did that tiny little leftover last that long?? It's like Chanukah!
This sweater brought to you by the generous and merciful yarn gods who watch over my knitting. (Yes, I do still have the collar to do, but I had planned on using other yarn for that anyway. ) Too bad the yarn gods don't do seaming.... posted by alison at 12:07 am
| comments (11)
november 18, 2003
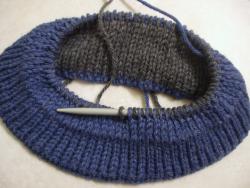
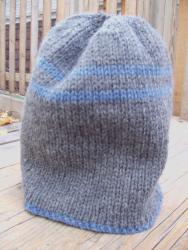
quadruple knit Over the weekend, I decided to start another of the Christmas presents. But I haven't quite finished the first one yet. Does that count as progress?? Before you answer, read this.... For no other reason than sheer insanity, I'm making this hat double knit (reversible stockinette). So instead of 80 stitches I've got 160. And I have to knit twice around to make one row. The result sure is cool though.
Hold the applause. I've had a heck of a time getting this thing started off right. I've never done double knit before. So I thought why not take it to Knitsmiths where I usually have so much fun chatting with everyone that I invariably make a giant mistake in my knitting. Yes, perfect - take everything to Knitsmiths and try to learn how to do double knit there! After some serious boo-boos followed by impressive saves, I got the double knit to work. Woo hoo. But it was only about wrist size and so it had to go. Look at how it separates into two sides of knitting when you take the needle out. Cool. Another start created a belt-sized version. Grrrr. After casting on for a third time, I knit the above which fits my head perfectly. Alas, it is not for me but my brother-in-law, so it too is no more. This double knit is a strange little animal. The total number of stitches is split between the front side and the back, which means you need to cast on twice as many but the stitches have a lot of stretch, so double knit objects are actually larger than they appear or so I've learned. I'm casting on again today. Progress or not? You decide. posted by alison at 8:09 am
| comments (21)
november 19, 2003
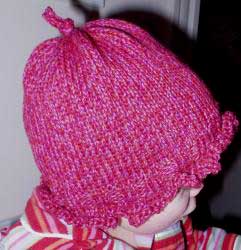
a gaggle of caps Last class of beginning knitting yesterday and we had finished hats all around. Several of the students even wore their hats while starting new projects. It was so exciting to see them all with their hats on, all knit from the little pattern that I made up. I liked the finished hats so much that now I've decided to use my own pattern for one of the hats I'm making as Christmas gifts. Stay tuned next week for Alison's Beginner's Hat! I had several hats to finish yesterday as well: the calmer lace cap, the little red ruffled chemo cap, and the phat hat chemo cap.
More hats are on the way. I finally got the count right on the double knit hat (fifth time's a charm!). I'll be making my beginner's pattern for my sister-in-law. And now hubby wants a hat for Christmas. Add another one to the holiday gift list! posted by alison at 10:34 am
| comments (10)
november 20, 2003
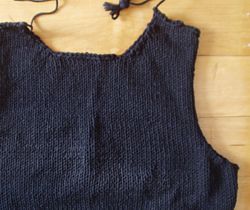
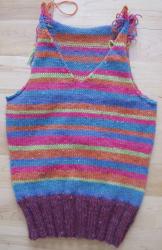
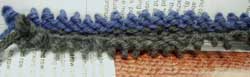
vee Sometimes help comes from the yarn gods and sometimes from fluffy yarn buddies. Thanks Becky for the Legende leftovers! I used up my last bit of blue on the back and was able to finish the front of the phildar leftovers vest with the handful you sent over.
I decided for a wide v-neck and will be doing the neck and armholes to match the bottom edge. And now for a peek at why I'm giving up stripes for a while. Yikes!! This one is going to be slow to the finish line. posted by alison at 8:28 am
| comments (14)
november 21, 2003
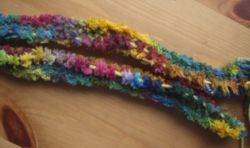
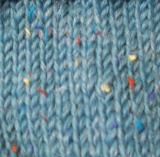
legends in the fall I can't bear to think about weaving in those ends on the leftovers vest right now. I love the Legende yarn though. It's so scrumptuously soft and the fall colors coordinate with each other wonderfully, right down to the tweedy flecks.
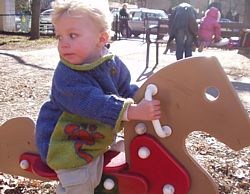
I've got quite a bit of this green left over and plan to use it for one of the Christmas hats I've still got to make. I had planned to use the green on one of the boys' giraffe jackets, but decided to stick with the blue (thus my running out of blue yarn for the leftovers vest). Speaking of the giraffe jackets, the boys are wearing them at every opportunity. Between cold and rain, we've actually had a couple of beautiful fall days in the last two weeks so the giranimals could come out to play (a November playground day in Boston - bonus!!).
PS - You have got to check out the giraffe jacket that Sharlyn just finished! posted by alison at 8:13 am
| comments (10)
november 22, 2003
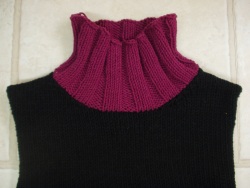
black cherry Sooty mango with a cherry on top.
So, I whimped out on the crazy big collar for mango. After knitting the back half of it, I decided I didn't love the wrong-side flipped over look or the split collar look as much as I liked the perfectly even ribbing. I did too good a job of picking up stitches to go hiding it all with collar! So I ripped it all out and using the neck from Cherry Picking as my model, knit on. Yes, the infamous "Cherry Boobs" has been a great resource. I borrowed a few of the numbers for armhole/sleeve shaping from that pattern when knitting the sleeves. And now I've swiped the neck. I guess it's only fitting that I've introduced the cherry color. posted by alison at 8:17 am
| comments (11)
november 24, 2003
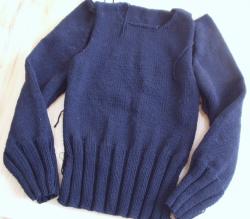
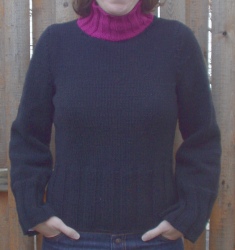
sooty mango
Even surprised myself by getting this one done so quickly. I sat down over the weekend thinking I'll just do what I can on the finishing. No pressure, no goal. I'll seam a little then weave in an end or two and we'll see where I am when the boys wake up from their nap. The boys must have slept pretty well, because before I knew it, I had a sleeve in and most of the ends already woven in. Another evening of finishing and I was finished! This sweater is a great example of knitting to fit. Like a glove. The high ribbing (which doesn't show up well in a picture) makes me feel skinny. I can't be putting on any holiday pounds this year! It's so comfortable though. Although it's snug and form-fitting it doesn't feel tight at all. Plus, I love those big sleeves. Mmmmm... big sleeves. I gotta jot down the exact measurements of this sweater so I can use them in the future when resizing other patterns. I'm not quite sure how much it resembles the original Mango pattern, but I love it! posted by alison at 12:33 am
| comments (20)
november 25, 2003
and the hats just keep on coming Introducing Alison's Beginner's Hat. A whole knitting class packed into a simple hat with a rolled brim, followed by some ribbing and finally crown shaping. And the adventurous beginner or color nut (like me) can add some stripes for fun! This is a Christmas gift for my sister-in-law who likes green and obviously has a bigger head than me. So that's one more Christmas gift done. Wait, two more presents done. I finished the double knit hat for my brother-in-law as well! Hey, it's reversible! I wanted this hat to be really warm, so in addition to doing it double-knit, I decided to knit the Cascade 220 (leftovers from the boys' mutssjaals!) at a much smaller gauge. Hubby says that if his brother doesn't like it, he'll be happy to give it a home on his head. Awww. (Free patterns to come!) posted by alison at 12:38 am
| comments (16)
abc: alison's beginners cap a knitting class in a hat*
Techniques: Materials: Gauge: Hat Measurements: Instructions: And for the adventurous, change colors as you like by dropping the old yarn at the end of a round and starting the new round with a different colored yarn. When weaving in ends, twist the two colors around each other once to close any hole that might have formed when changing colors and weave ends into their respective color areas. *This pattern was written to introduce beginners to all the basic knitting techniques. If you already know how to knit in the round, you can join after casting on or knitting the first row and skip the lesson in seaming! posted by alison at 5:24 pm
| comments (1)
doubleknitski One warm-a** double knit ski cap
Materials: Gauge: Finished Measurements: Instructions: Row 1: With color A *K1, bring yarn forward, slip next stitch purlwise, bring yarn back*, repeat from * to * across the row. DO NOT TURN WORK! Now you can join and begin knitting in the round. Each round will be knit twice. The first time around, you'll be using color A and following the instructions for Row 1. The second time around, use color B and follow the instructions for Row2. Continue in this manner for 5", having just knit with color B and using Row 2 instructions. Make stripe: Knit next round using color B and following instructions for Row 1. Then knit one round using color A, following instructions for Row 2. You'll notice that on the first round after switching colors all of your stitches will be in color B. Pay attention in the next round that you are knitting and slipping the correct stitches, as there are no more color cues to remind you which stitches you should be working. Continue in this manner for one more complete round (once around in each color). Now return to original instructions - Row 1 in color A and Row 2 in color B - for three complete rounds (three times with each color). Begin decreases: Knit one complete round normally (one round with each color following original instructions). Then continue decreasing: Knit one complete round normally (one round with each color following original instructions). Then continue decreasing: Continue decreasing by doing decrease rounds only, switching to double-pointed needles when necessary, and following pattern established above: Cut yarn ends leaving 8" tail. Thread each yarn end onto tapestry needle and through like-colored stitches. Pull on each yarn end to close the top of each side of the hat. Weave in ends on each side by following the path of the stitches (like duplicate stitch) so they are not visible. Put on hat and feel the warm!! Have a basic stockinette stitch hat pattern you already know and love and want to knit it double knit?? Just double the number of stitches you would normally cast on and follow the double-knit techniques I've outlined in the pattern. posted by alison at 7:19 pm
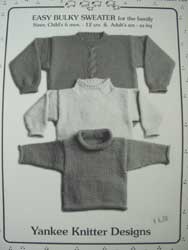
the you don't need a new pattern hot water bottle pattern You wanna to make a hot water bottle cover? No problem! I've had a lot of people ask me for a copy of the pattern for the hot water bottle cover that I made last year. I'm sorry to say that cannot share the pattern (from Rowan #28) because it is copyrighted. For those of you wishing to use that pattern, you can purchase the Rowan magazine or borrow it from a friend. There are also hot water bottle cozy patterns in the following books and magazines: But you know what folks, you don't need no stinkin' pattern. You can make one yourself. A hot water bottle cover like the one I made and the ones I've linked to is just like a little sweater. A sweater for a very small, skinny and armless person. You got sweater patterns already, right?? Well, pull out your favorite sweater pattern, ignore the sleeves and size it down to hot water bottle size. Presto change-o, your favorite sweater pattern is now a hot water bottle cover pattern! Can't you just picture your hot water bottle in one of these Yankee Knitter sweaters? Or these basic sweater patterns from Ann Budd? Or this sweater from Rebecca Baby & Kids? Or this Jil Eaton MinnowKnits cardi? Here, I'll help: 1. Lay the hot water bottle down on a table, nozzle up, like a little body just waiting for a sweater. Take its measurements: width, length and nozzle. You'll be using these measurements instead of your sweater pattern's measurements (chest, length to shoulders, and neck/collar). 3. Mulitply the number of stitches per inch from your gauge swatch by the width in inches of the water bottle across the bottom. 4. Cast on this number of stitches for the FRONT. If you want to be fancy, you could cast on six or eight fewer stitches and increase one stitch at each side for the first few rows to give the bottom edge of the cover a rounded shape. OR even easier, start with a half inch of 1x1 ribbing so that the sweater will cinch up around the bottom of the hot water bottle. 5. Knit straight until the cover (after any ribbing) is as long as the water bottle's "body". Does your favorite sweater pattern have a stitch pattern, a cable in the center or an intarsia motif? Go ahead and recreate that here on your hot water bottle cover! 6. Now mulitply your number of stitches per inch from your gauge swatch by the width of the hot water bottle's nozzle at it's widest part. The result is the number of stitches you need for the neck opening. (Just like a sweater, we've got to make sure that the head fits through the opening!) 7. Bind off "shoulder" stitches, leaving appropriate number of center stitches on a spare thread for the collar. Again, you might want to decrease one stitch at each end for a few rows to give the top edges a rounded shape. 8. Repeat steps 4 thru 7 for the BACK. Maybe you want to change stitch patterns for the back? Maybe you want to leave the cable or intarsia motif off of the back? Do what you like here. Be creative! If you're really feeling adventurous, knit the back in two pieces that will overlap, so that the cover can open up like a pillow sham. OR make your hot water bottle sweater into a hot water bottle cardigan! Quick, grab a cardigan pattern. 9. Sew up shoulder and side seams, joining the front and back. It's looking like a sweater now, isn't it?! Slide stitches for the neck from spare thread back onto needle. Knit the neck following your favorite pattern. I'd recommend a big turtleneck - very becoming to a hot water bottle. 10. If you leave the bottom open, you can slide the bottle in and out easily, so you can wash the cover. It is just like a little hot water bottle sweater! If you've made the neck large and stretchy enough so that the empty bottle will fit through (or if you knitted the back in two pieces), you can seam up the bottom. That's it! You only had to do math twice and you used a pattern you've already got and like. Make them for everyone this holiday season! posted by alison at 9:31 pm
| comments (2)
november 26, 2003
pattern day It's pattern day at the blue blog! My way of saying thanks to all of you fine people who stop by and support me and my knitting every day. The abc beginners' hat and doubleknitski double-knit ski cap patterns are up along with a bonus guide to making your own hot water bottle jumper. Happy Thanksgiving and happy knitting! posted by alison at 12:23 am
| comments (25)
november 29, 2003
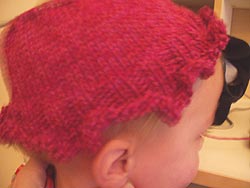
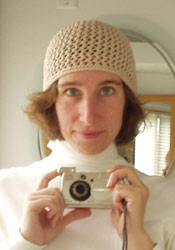
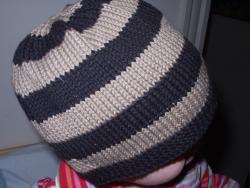
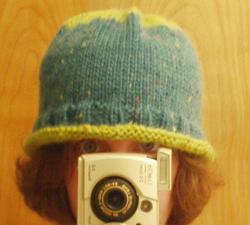
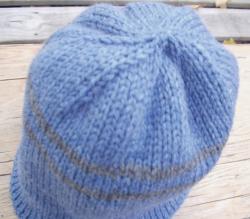
merry christmas to me Tis the season for presents, right? I had to do it. I got tired of making calmer caps and having to give them away, so I finally made one for myself.
I used some Phildar Sport Laine I had in my stash (thanks, Becky!), which is aran weight wool so despite the lace patterning this hat should keep my head pretty warm. It seems like at some point in the history of my being cold, I decided that all of my own winter hats, scarves, gloves should be this blue color (exhibit a: my blue hat). I have to admit to being lazy fashion girl with only two pairs of shoes and one hat/scarf set! But with a small stash of pale blue yarn, I can always make myself a little something new that still matches everything I've already got. It's a great excuse for me to pick up lovely blue yarn whenever I see it. And a couple of skeins will do in a pinch for a stocking stuffer for me (hint, hint - tee hee). posted by alison at 9:01 am
| comments (14)
|


